- Download this Guide
Overview
The Pig Popper™ is an intrusive pig signal that is manually reset once it has been tripped by a pig.
- Pig Popper Manual (PPM) alert (# 0200-19-09714)
Extensions are available in 6 inch increments for buried pipe locations. All units are also available in a lighted (beacon) version. The Pig Popper™ is designed to be fitted on most existing 2 inch fittings.
The Pig Popper™ Assembly may be installed in any location around the pipe – perpendicular to the center line of the pipe.
Installation
IMPORTANT Some dis-assembly of the unit is required prior to welding the pipe nipple to the pipeline. This will protect the working components and O-ring seals.
WARNING Welding the Pig Popper™ to the pipeline with the trigger ball assembly inside the pipe nipple will compromise its integrity and will void the warranty.
Tools Needed
 1/2 inch x 3/4 inch socket adapter (included)
  3/16 inch hex key
 Socket wrench with 1/2 inch drive
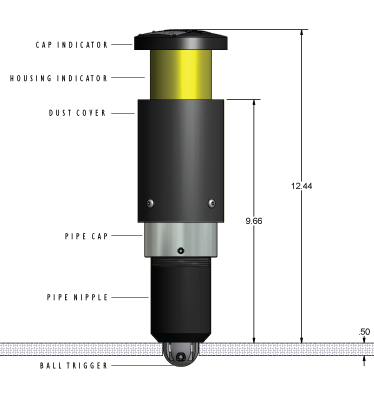
Remove the Pipe Nipple
Step 1 - Trip the Trigger Ball to release the Indicator Cap Assembly. This will release the Cap Assembly from the internal catch finger assembly. Does not apply to model PPE.
Step 2 – Use the 3/16 inch hex key to remove the safety set screw from the pipe cap.
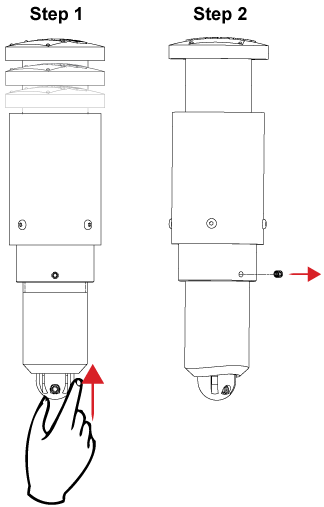
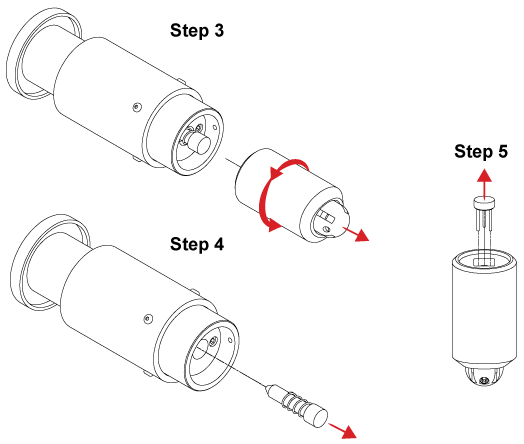
Step 3 - Unscrew the Pipe Nipple Assembly from the Pipe Cap (counter clockwise).
Step 4 - Remove the Spring Guide Assembly and set it aside to re-install later.
Note/Exception For Model PPE, the Spring Guide Assembly is pre-adjusted to the necessary length to trigger the indicator (Adjustable Spring Guide Assembly).

Step 5 - Remove the Trigger Pin from the Trigger Ball Assembly to prevent it from getting it lost.
Remove the Pig Popper Plug Assembly
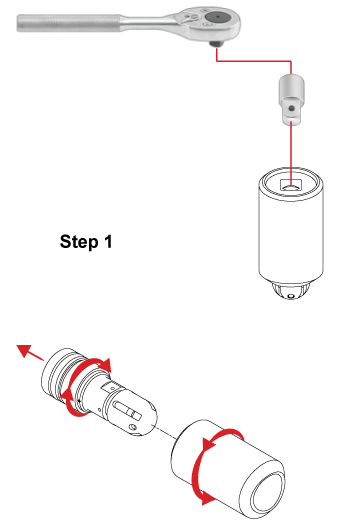
Step 1 - Remove the Pig Popper Plug Assembly (turn counter clockwise) from the Pipe Nipple using the ½ inch X ¾ inch socket adapter included with the pig popper™ kit.
Note You will need a socket wrench with a ½ inch drive for the adapter socket.
Install the Pipe Nipple

IMPORTANT – EXTREME CARE REQUIRED when welding the nipple to the pipeline. The Pig Popper is made of high precision, close-tolerance parts and any deformation of the nipple will result in the inability to reassemble the unit after nipple installation.
COOL TO THE TOUCH - It is important to keep the nipple as cool as possible during the welding process by allowing the weld and surrounding material to cool to the touch between each weld pass and prior to installing the plug assembly.
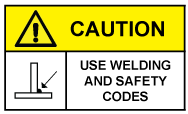
Welding Codes
| SME B31.4 | For liquid transportation systems inclusive of hydrocarbon, liquid petroleum gas, anhydrous ammonia and alcohol. |
| ASME B31.8 | Gas transportation and distribution piping systems. |
Pressure / Hydro Information
| Hydro Testing | Hydro testing can be performed with the pig popper plug assembly installed in the nipple; NO ADDITIONAL PIPE CAP ON THE NIPPLE IS REQUIRED. It is not recommended to use a pipe cap for pressure tests as they can be over-torqued, causing damage to the nipple. |
| Debris/Brass Plug | If there is a high amount of debris expected, it is recommended to replace the pig popper plug assembly with a solid brass plug during the test. This will prevent any debris from getting into the mechanism of the pig popper during testing. Brass plugs are available from Enduro. |
Attach the indicator nipple to the pipeline in accordance with the pipeline company’s welding specifications in the following sequence.
General Installation Procedures
Step 1 - Mask off the internal and external threads on the Pipe Nipple to protect against weld splatter.
Step 2 - At the point of installation, drill the pipe for indicator protrusion into the pipeline by using a 1-1/2” diameter drill bit.
Step 3 - Remove all drill shavings and burrs from the edge of the hole.
Step 4 - Carefully position the nipple on the pipe so that it is centered over the 1-1/2” hole and level with the line pipe. Proper alignment is critical for the pig popper to function correctly. Weld in accordance with the appropriate welding codes. Allow weld and nipple to cool to the touch.
Step 5 - Remove all masking material.

Pre-existing Nipple
Step 1 - Verify with the factory that the housing is compatible for use with the pig popper.
Step 2 - Chase the internal threads of the nipple with a thread chaser. This will require a special 1.875-8 thread chaser available from Enduro. The nipple is now ready for pig popper installation.
Insert Trigger Ball Assembly into Pipe Nipple
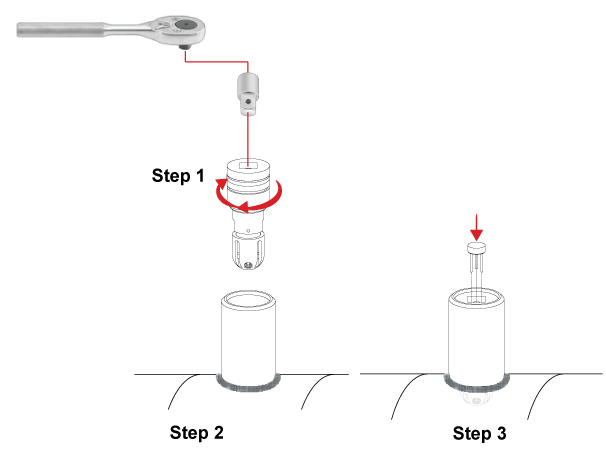
Step 1 - Apply grease to the Pig Popper™ housing O-rings.
Step 2 - Install the Pig Popper Plug Assembly into the welded Pipe Nipple using a ½ inch drive socket wrench and the provided ½ inch to ¾ inch adapter.
Step 3 - Place the Trigger Pin Plate pre-assembly inside the Pipe Nipple.
Spring Placement
Step 1 - Apply grease to the top portion of the Spring Guide.
Step 2 - Place the Spring back onto the Spring Guide.
Step 3 - Slide the Spring Guide, with the Spring on it, into the Pipe Cap Assembly.

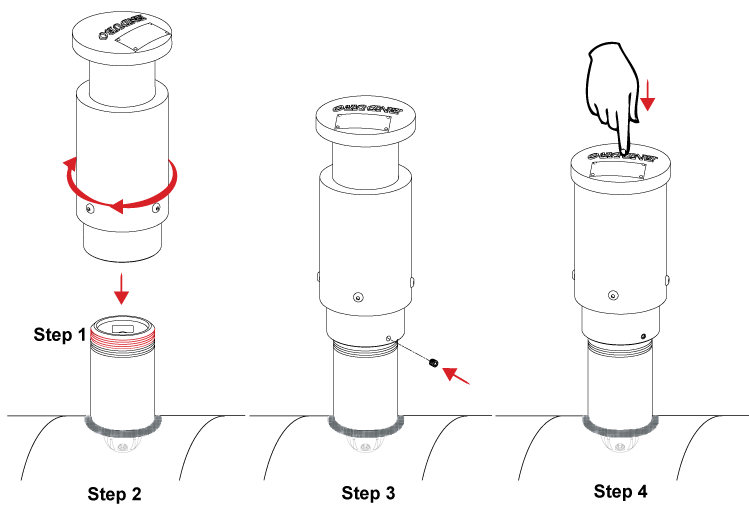
Install Pipe Cap
Step 1 - Apply Teflon tape or anti-seize to 5 to 6 threads of the Pipe Nipple.
Step 2 - Install the Pipe Cap Assembly onto the Pipe Nipple with the Spring Guide protruding thru the Pipe Cap and Catch Plate.
Step 3 - Tighten the Set Screw into the side of the Pipe Cap, thus locking the cap in place.
Step 4 - To set the unit, push down on the Dust Cover Cap until a click is both heard and felt.
The unit is now ready to be placed into service.
questions or comments please write to communications@enduropls.com

